
I'm going to use this photo: (it is also seen in this post)

***Note: I am using Picnik for this. I do not know how to do it anywhere else!***
You can do this with any photo, and of course you can experiment after step 6. :)
You can also click any photo on the post here and it will just pop up and will be alot bigger. It will not open in another tab unless you right-click on it and open it up another tab.
Step 1: (though technally step 1 is choosing your photo and uploading it to Picnik)

Click "auto-fix". It usually fixes it up pretty well, but if you don't like it or it doesn't do anything, then you can click "Undo" and it will undo it. You can also crop your photo and do other things at this time.
Step 2:

Once you are done auto-fixing your photo, click on "Edits" at the top (Step 1 on photo above). Click on Black and White (it should be at the top. "Step 2" is pointing to it). Where it says "Step 3", click on the little paint brush.
Step 3:

When you click on the paintbrush, a box will pop up onto the photo. This box can be dragged around by clicking and dragging on the green bar on the top of the box. Click on the "original" button. Under the "original" and "effect" buttons there are 2 sliders. The first one is for the size of the brush. The second one is for the brush strength. (You don't need to worry about the second one). The smaller your object (or person or whatever), the smaller your brush needs to be. I suggest, however, to zoom into the photo (unless you are painting a big object). To zoom, click the big mountain button or use the slider in the bottom right hand side of your screen (My screen capture cut that part off). Your photo should then show up in a smaller form just above it. You use this to change what part of the photo you are viewing. Start painting! :D And if you ever go over too far (like you paint over the lines), click on the "effect" button, and paint the effect right back on! :D
Step 4:

Just keep painting till you are done! For me, the bigger the object, the easier it was. I mean, having to paint the Violins and Violas were a BEAR! XP The Cellos and Bass were much much much easier!
Step 5:

Something that I do that helps me see whether or not I got everything or not is this. I click on the little box under the "brush strength" slider and it reverses the effect. It will basically reverse everything! This helps me see what I got and what I didn't get. It then flip-flops on what you paint. If you want the original to show through, you have to paint using "effect" and if you want the effect to show, you have to paint with "original" (and I mean by show as in after you reverse it, it will show). Plus it looks pretty dang cool! I saved the photo so you all could see it up-close:

Step 5 1/2:

When you are completely done with painting the photo, and the "Reverse Effect" button is not checked, then click the button that says "Apply"! :D
Step 6: (If you want to go off of the beaten path and experiment yourself at this point, go right ahead!) :)

Now we will give it a boost! No, literally! Click on the square that says "Boost"! You see the little box that is highlighted in yellow? Make sure you read it! It will help and I don't want to have to do any more typing than necessary haha ;) The "strength" slider determines how strong the boost will be. Don't click on the paintbrush unless you want to paint the boost only onto the object you were originally painting (Which, you know, isn't a bad idea... I should have thought of that earlier...). Once it is at the strength you want it, click "apply"!
Now, after this you can really explore and do whatever you please, but I'll continue to put up photos that show you how to do this.
Step 7:

Scroll down a bit and you will see a button that says "Matte". Click on it! (Please read the square that says "About Matte".) The size slider will change how big the glow is, and the strength will change how strong it is. You can decide what you want for you photo.
Step 8:

Up at the top where you clicked to go to the effects, find the button that says "frames". Then scroll down to where it says "Museum Matte" and click on it. You can then choose what colors you would like and how thick you want the borders. (I personally like this one. Maybe it's just me.) Then when you are done click "apply"!
Step 9:
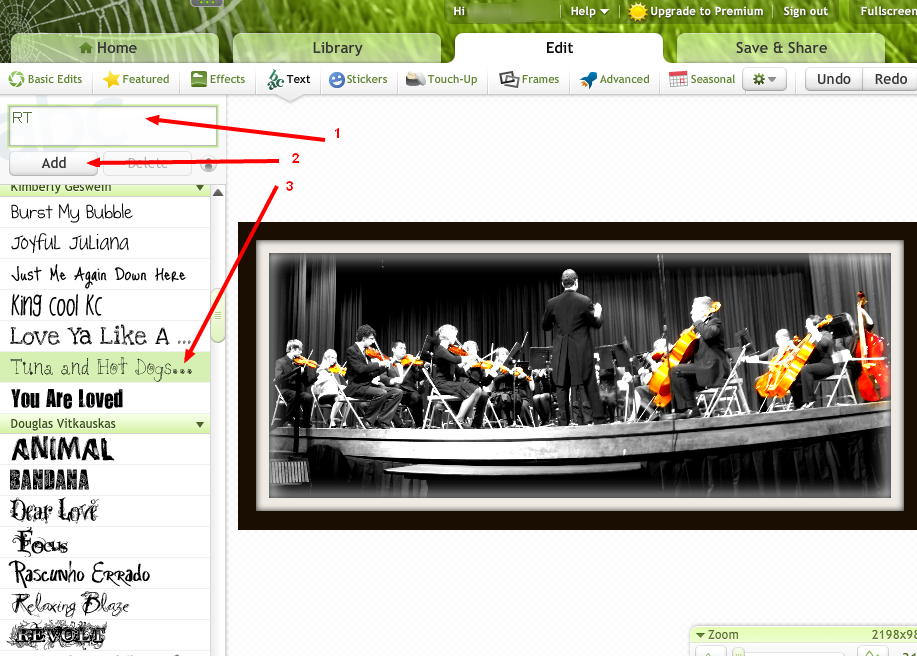
I will now show you how to add words onto your photo! :) Go back up to the thing where you clicked on frames and click on "Text". Then in the box (arrow "1" is pointing to it!), type or copy-and-paste what you want put on your picture. Then scroll down to find the font for your photo that you want, and then after you have clicked the font you want (haha that rhymes!), click "add"! :D
Step 10:

You can now adjust and move around your text just by clicking and dragging the text and/or the little circles around the text. You can also change the color and lots more in the "Text properties" box that will pop up whenever you click on your text in the photo. Go ahead and experiment! :D
Well, there you have it!
I hope (hope hope hope hope *crosses fingers*) that I will be able to keep up with this enough so that you guys can get some new techniques! :D
 |
| This is something else that is in the "frames" section. :D Go and experiment! Maybe you can teach me something! |
 CheletheCello
I linked up to the following parties:


I'm enjoying your "Somewhere Over the Rainbow" piece as I read this post. I absolutely love the techniques you used to highlight your photo. I'm a big fan of Picnik, and will definitely be giving it a try!
ReplyDeleteThank you so much for sharing your tips and tutorial at Rook No. 17! I'm spotlighting your post on my Facebook page today.
Jenn
Thanks Jenn! :) I saw a similar photo done with a different orchestra group, so when I got photos of my group (well, the group I would be in haha), I decided it would be cool to do that.
ReplyDeleteThank you for hosting the linky party and for putting the link on your Facebook page! :D